FsClient settings
This section is about configuring FsClient to match your requirements. Before you are ready to run, you might want to set a few things.
From now on, flightplan information needs to be accessible via the network for all clients. For that purpose, each machine needs the FsClient folder to be accessible eventually as a slave. FsClient will do that if the permissions are adequate, which depends on the system's settings.
During a first run, you may encounter the following problem: "FMC machine does not exist. Please create a share to FsClient folder."
If there is not enough permission in your PC to create the share automatically, you have to do it manually. If the system could not do int for you, there is a permissionms problem, please solve that first.
The FsClient 7.0 folder should then be shared as FsClient, and for 8 users. Write permission is needed.
Make sure that you have removed shares of an old version, or the shares will not be created!
1. Connection box
Connect to Host: FsClient will find the FSXpand PC to connect to if you type its name here (usually your FS PC). You can add the IP address if you want, it may solve name resolution problems.
IP address: FsClient will find one of the IP address on one of the network adapters of this PC it is running on.
If for some reason you change this IP address of your PC,
clear the IP box, and restart FsClient, and this IP address of the FsClient machine will be found again.
Whenever you have changed an IP address of a PC, reboot all PC's on the network!
FsClient port: This value has to be set individually for each FsClient. You can leave it alone with the first FsClient you install, for the port value of the first FsClient is the same as in FsXPand.
So much for installing one FsClient on a network PC (being not the FsXpand PC).
If you want more FsClients, each connected FsClient will need:
1. An IP address of its own,
2. A port number of its own.
An IP will be found on each PC where you start an FsClient. The port of the second FsClient will have to be increased by one, and so on. If FsXpand is configured using port 9000, FsClient #1 will have 9000, but FsClient #2 will need 9001 and so on.
- If you are going to run more than 1 FsClient on the same PC, each FsClient has to get an IP address of its own, and a port value of its own.
- If you are going to run FsClient with FsXpand , on the same PC, FsClient has to get an IP address of its own, being not that of FsXpand.
In short, each program always needs its own IP, FsXpand has a port value that is increased by one in each extra FsClient setup that you create, regardless of the PC it is installed on.
There have been reports of port 9000 being used by trojans or worms. This is true of most port values nowadays. If your PC denies port 9000, this could be the result of some smart anti-virus program on your side. On the other hand, it is hard to find a port address that has never been used for another (even malicious) purpose..
The procedure to run an extra FsClient on one PC is as follows:
- Install FsClient
- Run FsClient to get the IP address it is on
- Add another IP address to the same network adapter of which FsClient just found the IP address
- Duplicate your FsClient installation in another folder (copy)
- Configure your second FsClient with port 9001, and type the IP address you have added to your adapter.
At the bottom of the main window, type a name to identify each particular FsClient.
FS data/s: Once FsXpand found, the blinker will blink and you will see the connection rate (transfers per second).
Talk to FsXPand (ms): The value of 100 wil usually be right. Setting this to a lower value will cause more network activity. On a slow machine, a lower value may be required to leave enough resources for the panel to refresh..
FMS machine: You need to indicate the actual FMC hardware: the name of the client machine where your CDU is loaded.
Map updates from: Future option
More on IP addresses
2. Panel box
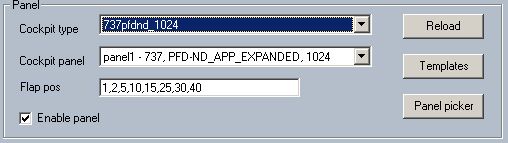
Cockpit type : Select your panel here only when you want to create a panel setup. On connection, the panel displayed will be set by FsXPand. There has to be a panel with the matching name of course in both FsXpand and FsClient.
Cockpit panel: If you want, select the subpanel. If this PC displays the basic flight instruments, this could be panel1. Engines are on panel2.
If you want, add more subpanels. In the FsClient/cockpits/aircraft name folder, copy a panel#.cfg file and a gauge# folder, and rename in the same format.
If you want, add subpanels. Just copy a panel#.cfg file and a gauge# folder, and rename with this format.
If you use an ND, or EICAS panel, you will want the ability to switch between various modes.
From v 6.0, changing the ND mode is done by the Alt 1-7 keys. It will reload the ND in EFIS_ND_MODE_1 to 7.
Changing a whole panel will only apply to the EICAS with standby instruments, primary or condensed, and the secondary EICAS 2 pages. Switching no more than 2 pages in total.
PANEL_1_Select Shft-X
PANEL_2_Select Shft-/
Apply key commands only when the panel is on screen and active.
For more key commands, go here.
Another way of switching the EICAS is by assigning a joystick switch or channel to the panel swap function (press Stick setup ) on the main window.
The switch will allow panel 1 and 2 to be switched. If you want to switch 3 or more, use a joystick slider or a rotary switch with attached resistors (2 for a 3-panel setup).
You can do panel switching from another FsClient: Panel menu, Allow remote panel switching . When checked, FsClient will follow panel switching on any other FsClient. Uncheck this on the switching FsClient!
Press Panel Setup to configure the panel.
Reload: This will reload the current panel.
Templates: Press if you want to create a new a/c configuration. Select a suitable panel from the templates, type a name, and press OK. Be sure to repeat this in FsXPand, or else you will not be able to get your new panel loaded in FsClient.
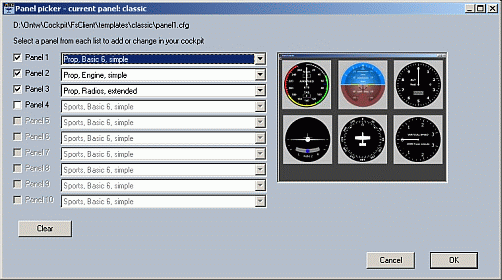
Panel picker: Opens the panel picker.
Panel boxes: Tic a box for each panel you want to include.
Panel lists: Select the panel you want from the list.
Clear button: To clear the configuration if you want to start anew.
OK button: You wil be asked to give the panel a name. You can overwrite the existing panel, or create a new name.
Cancel button: The operation will be cancelled.
Flap positions: (FS98 only) Provide information for configuration of the rotary and linear flap gauges.
If you are using one of these flap gauges, put your flap settings in the Flap string box. Forget the zero, and put the deflections in the box separated by comma's. For a B737, you would enter 1,2,5,10,15,25,30,40. For the Fokker 100, this would be 8,15,25,42.
Enable panel: FsClient could be used for controls only, in that case uncheck the box. You could use a PC only for the sake of connecting of another stick. For instance, you could use the joystick ports on your side-view PC's running Wideview.
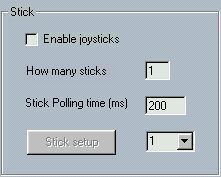
3. Joystick box
Enable joysticks: FsClient will read your sticks every 200 ms or so, depending on the polling time set.
In order to make this work, you need to install a game controller on each PC that uses control input. The type depends on your control hardware. Plug in any USB stick or converter you may want to use. Windows will recognise the device.
Standard game controllers: Add an analog control to your system via the control panel, game controllers, and add the appropriate type (max 4 axes, 4 buttons).
Do not forget to calibrate your control device, whether home-made or a joystick). USB devices must be calibrated as well.
How many sticks: Put the amount of sticks plugged in here.
Stick polling: You need not set a value for stick polling. Usually a polling time of 200 ms (milliseconds) may be enough if you use only controls with a slow function like throttles. If elevator or aileron are used via FsClient, you may need a lower value, more like 20-100 ms.
This will certainly be the case if you want to use your game port to connect rotary encoders.
4. AP box
The status of your MCP is reflected here. It is read only, write commands using key board commands, not clicking or typing.
5. Menu
File, Import panel: For each available cockpit you will be asked whether you want to import. This will limit the amount of cockpits to only the ones you have in use. There is just one Default cockpit in FsClient, the rest will always be available from the templates and your imports. This version will only import cockpit panels from version 6, not before. If you save your imported cockpits as a template, the panels will be available in the panel picker.
File, Save as template: Type a nice name in the box and clock OK. After restart of FsClient, you will be able to reuse this panel.
File, Exit: Exit FsClient
Panel, No Border: Will remove the blue header bar. The panel remains sizeable but you can no longer drag it.
Panel, Lock gauges: This is to prevent the gauges in your panel accidentally being dragged from their place.
Panel, Allow remote panel switching: When checked, FsClient will follow panel switching on any other FsClient. Uncheck this on the switching FsClient! Panel switching itself is done by assigning a joystick switch or channel to the panel swap function (press Stick setup)
Panel, Show gauge names: Check this if you want to see the name tags of the round gauges.
Panel, Conversion: You can convert your subpanel to another screen resolution. Select one of the options. If you want to set values by hand, select Custom resolution. Your current subpanel will be on the new resolution after a reload of the subpanel.
Panel, Copy gauge: Replace a gauge with another one from another panel
Panel, Mirror : This should swap your gauges left to right and vice versa.
Panel, Configure key commands: This will open a dialog to help you assign you own key combinations to functions of the panel ( Glass panel configuration )
Panel, Key commands on: This will allow keystrokes to be tracked by FsClient in order to simulate MCP or EFIS commands.
Flightplan, FS2004 or FSX (Basic version): Flightplans can be imported from FS2004 or FSX. Just browse to the location of your .PLN file. It needs to be saved in FS, not in another tool.
If the airport does not exist in the Flyware database, the program will quit the load. If a waypoint or navigational aid in your flightplan is not in the Flyware database, it will be skipped silently.
With the basic version, it is only possible to load a FP separately on each ND. Captain and F/O will have to load their own flightplan. And fly it by hand (although it is perfectly possible to simulate an FMS by flying FS in GPS mode automatically).
Flightplan, Update AIRAC: Update the FsClient database from the AIRAC cycle installed in FsXpand.
Do this on each of your clients. This will take a few minutes. While updating, it is best to minimize the network workload.
You need only to do this on the FsClient where you have a Navigational Display running.
Please note that although data for terminal procedures are present, they are not yet in use in the current version of FsXpand.
If you get an error accessing files, it may be that you do not have full administrator permissions on the shared folders.
Flightplan, FMS Type (FMS version): Select your dynamic (737) model here.
Hardware, CPFlight MCP: Check this if you have successfully setup your MCP hardware, and are aware of your COM port value. FsClient will ask you for it.
Help, Manual: Show this manual in your webbrowser.
5. Buttons
Panel setup: This will open the panel setup window. The explanation is in the panels setup page.
Reload: This will reload the current panel.
Exit: This will exit FsClient. If you restart FsClient, and FsXpand is still up, FsClient will resume the data transfer.